Compatibility
PeriPedal is supported on Windows Vista, Windows 7, and Windows 8. PeriPedal will run on Windows XP SP3, but is not officially supported.
In order to use PeriPedal you will need an ANT+™ USB stick for your computer so PeriPedal can talk with your ANT+ devices. You will also need ANT+ devices. Visit the ANT+ Directory for a list of compatible products.
Instructions
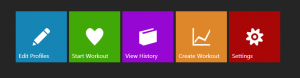
Once PeriPedal is installed launch PeriPedal. There will be an icon in your Start Menu, or you can browse to your installation directory. Once launched you will be given 5 options: Edit Profiles, Start Workout, History, Create Workout, and Settings.
Edit Profiles
The first thing you will want to do is Edit Profiles. When in “Edit Profiles” the default selected tab is the “Users” tab. This is done by hitting the “Create New Profile” button. This button looks like an asterisk. Fill out the user information. Weight is in pounds. Under the ANT+ Heart Rate Monitor section press the “Search” button to find and pair your ANT+ heart rate monitor and press the “Pair” button on the desired device. Once all of the information is filled out press the save button.
Now that your User information is created it is time to create your bike information. Click on the “Bikes” tab in the “Edit Profiles” screen. Press the “Create New Profile” button (an asterisk) and fill out the requested information.
Press the “Back” button to return to the main screen.
Start Workout
Now that your profiles are created you can start your workout. Click the “Start Workout” button. On the left hand side select the number of users and a user profile and bike profile for each user. You can also choose your entertainment type. “Local Media” allows you to watch local video files. Netflix allows you to log into your Netflix account and watch a movie. None will display just your workout chart with no extra entertainment.
On the right hand side select the desired workout. The workout names and lengths will be displayed.
Once everything is setup press the “Continue” button. This is the right arrow on the upper right side.
On the workout screen you will see your workout view(s), your selected content, and the top bar. The top bar contains several buttons. The left arrow is a back button and will take you to the previous screen. The play/pause button will start or pause your workout. The Stop button (an X) will stop and save the workout. The gear button will open up a workout settings tab. Your elapsed time and interval remaining time are displayed in the center of the top bar. To the right you will see any instructions pertaining to the current interval.
By default your workout will start when all users start pedaling. It will pause when all users stop pedaling. This functionality can be changed by opening the settings screen (clicking on the gear button) and turning off the “Auto Play/Pause Based On Cadence” option.
You can switch your desired content mid workout by using the settings screen.
If you continue riding past the set time of the workout, the workout will continue until you stop pedaling. This allows you to continue exercising past the end of your workout if you want to. One you are done click on the stop button to save your workout and return to the main menu.
View History
The View History button allows you to view your past workouts. Your workouts are stored in the PeriPedal folder in your documents. If your username is Adam and you are running Windows 7 your workouts will be saved in the following directory: “Documents\PeriPedal\Adam”. Workouts are stored as CSV files.
Opening a workout will display the same chart you saw during your workout. It will also calculate your “Best Power Intervals” and display them below the chart. You can zoom in on the chart by selecting an area with your mouse. To zoom out double-click. Your statistics (average, max, etc.) reflect the visible area on the chart and will be updated with each zoom. Instantaneous values are displayed by moving your mouse over the desired point in time.
Create Workout
The workout creator allows you to make your own workouts for use with PeriPedal.
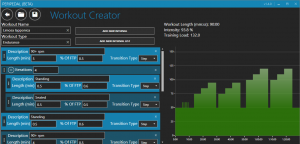
You can create a workout from scratch or start with an existing workout by using the “Open Workout” button. You can open existing PeriPedal xml workouts or import MRC files into the workout creator.
Workout Name – Sets the name for the workout. When saved this will also be the file name.
Workout Type – The type of workout. This can be any text and is displayed to the user during the workout setup.
A workout consists of intervals and interval lists:
An Interval consists of a description, length, percent of FTP, and Transition Type. The description is text that is displayed to the user (for example “Warm-Up”) during the workout in the upper right. The length is the length of the interval in minutes. The percent of FTP is the percent of FTP for this portion of the interval. (0.5 = 50% of FTP, 1.0 = 100%, etc.). The transition type is the type of transition between the previous interval and the current interval. The two options are “Step” and “Ramp”. A step goes directly from one interval to the next. A ramp spends the entire interval transitioning linearly from the previous interval wattage to the new interval wattage.
An Interval List is a list of any number of intervals that can be repeated multiple times by setting the “Iterations” number to the number of times that interval list should be ran.
Intervals can be moved around the workout list (and in and out of Interval Lists) by clicking and dragging on the area with 3 dots on the left side. Click and drag to move, click and drag while holding down ctrl to copy.
The chart on the right will update as you add / change / remove intervals. Above the chart you will see the workout length for the entire workout, the intensity, and the training load.
When you are finished with your workout click on the save button and give it a ride! The save button saves the workout under the workout name in the PeriPedal workout directory.